Motivation
MDVL has long been enhanced with Oracle VirtualBox. Virtual machines are used to test new systems (like Debian Sid for a new MDVL), experiment with other OS (like Solaris) and run Windows software (mainly on an old WindowsXP VM).
While this worked well, the VirtualBox solution had a few disadvantages:
- Running VMs without GUI was a bit tricky
- Sometimes the GUI crashed (probably) due to an incompatibility between the nVidia and VirtualBox kernel modules – this problem was rare and hard to reproduce but still very annoying
- VirtualBox requires a Kernel module. While this is not so much of an issue thanks to DKMS, it still proved an additional risk/issue during upgrades.
- Licensing issues: The Downloads-Page for VirtualBox mentiones the “VM VirtualBox Extension Pack” which is only provided under a non-free license which restricts server-usage.
- It proved to be hard to work with VMs when the GUI crashed (sometimes happens even under Linux ☺)
- Remotely accessing VMs via a console (like with VMWare vSphere) was not possible (see licensing issues above).
- VirtualBox did not support proper Windows 3D acceleration.
In order to solve some of these issues, multiple attempts have been made to transition to KVM with Virt-Manager. The attempts have often failed in early stages, due to some features being too difficult to use or not even available.
With the advent of Debian Jessie (Debian 8), the situation has finally improved towards a useful state. This article only discusses the KVM version included in kernel 3.16 / QEMU emulator version 2.1.2 and virt-manager 1.0.1. The situation may have improved with newer versions.
Why KVM and Virt-Manager?
One might wonder, why KVM was perferred over VMWare and XEN and why the front-end Virt-Manager was selected. While VMWare provides a few advantages over KVM and VirtualBox like Windows 3D acceleration and efficient memory management, it is also available under a non-free license. More annoyingly, this license also restricts commercial usage, which is not an option for MDVL.
The decision to prefer KVM over XEN mainly arose from the fact that XEN seemed more complex and previous experiments with KVM had already shown that KVM would be a good solution except for some points which could now be addressed as of the new version in Debian Jessie.
Virt-Manager was selected because it was reasonably simple to setup (it did not require setting up a whole data center ☺) and did not rely on a web-interface (current MDVL trends go toward eliminating most reasons to use a web-browser, thus a web-interface would have been counter-productive). Also, the user interface was similar to the previously used VirtualBox GUI and thus the transition would be simplified.
General Idea
In order to perform the transition, the following steps were performed:
- Consolidation: It was checked which of the existing VMs were still necessary. “Linked bases” were all unlinked.
- Conversion: Virtual hard drives from VMs to be transitioned were
converted. The following command proved to be useful:
qemu-img convert -f raw -O qcow2 <VIRTUALBOX-IMAGE>.vdi <KVM-IMAGE>.qcow2The qcow2-format was selected because it is the native KVM format which supports dynamically growing storage as well as “saving” a running VM to disk. - Re-Creation: For all VMs which should be transitioned, a new virtual machine was created in Virt-Manager using the previously converted virtual HDD
- Defect fixing: While linux VMs could generally be transitioned this way, all Windows XP VMs failed to run on the new hypervisor, most newer Windows versions (except for Windows 8.1) failed to run on the new hypervisor and Open Indiana (similar to Solaris) also failed to run on the new hypervisor.
- Re-installation: All VMs where transitioning failed were re-installed with Virt-Manager. This way, all VMs were able to run, but Open Indiana networking remained defunct.
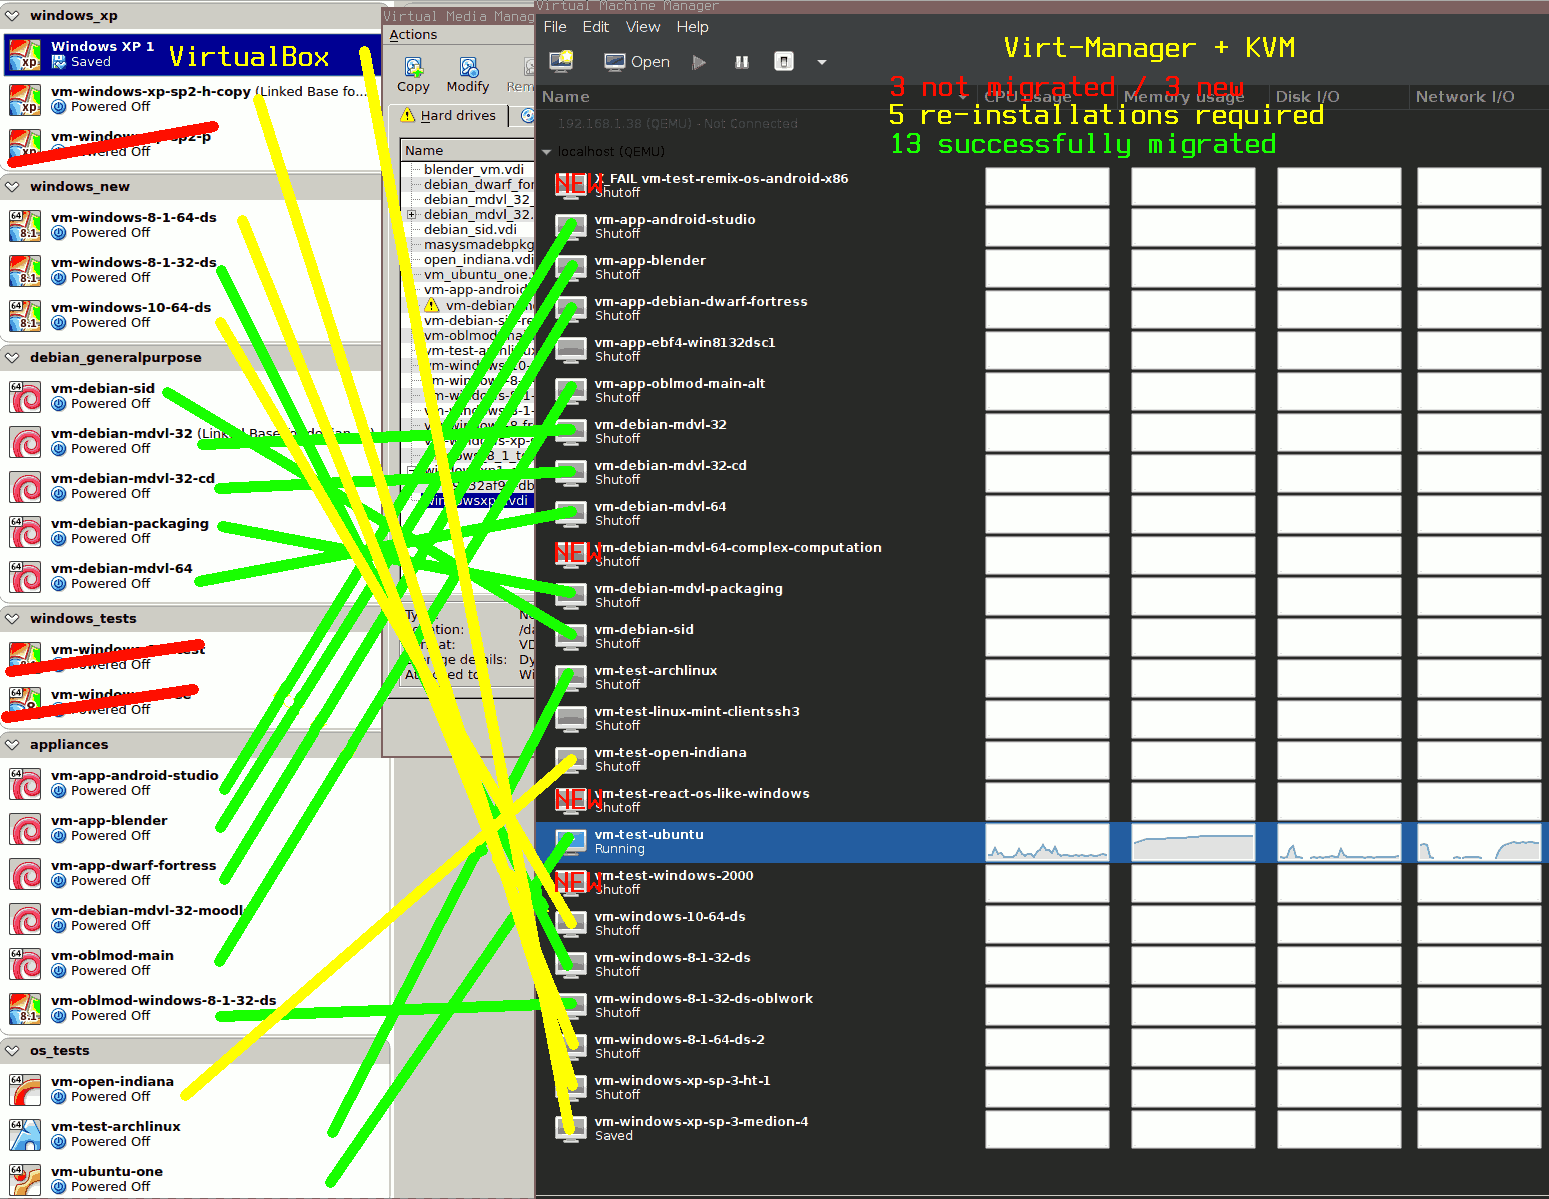
On the left in the transition overview picture, you can see the list of VMs before the transition and on the right you can see the list of VMs after the transition. Successful migrations are connected with green lines, re-installations with yellow lines and not-migrated VMs are crossed with red lines.
Btw. if you are migrating Windows XP VMs, check http://slashsda.blogspot.de/2012/03/migrate-from-virtualbox-to-kvm.html. I did not know of that page when migrating my VMs, thus I re-installed all of the WindowsXP VMs, but you might save time, trying out the solutions suggested in the linked article.
Recommended default Configuration
Unlike VirtualBox, KVM offers a lot of configuration options. Many of them are exposed to the Virt-Manager GUI and thus have to be considered by the user. It can be very time-consuming to tune these settings which is why I am presenting a few options I have chosen for different OS here.
My recommended default configuration is not primarily targeted at performance, but compatibility instead. If you require the highest performance, you will probably need to tune the options even further.
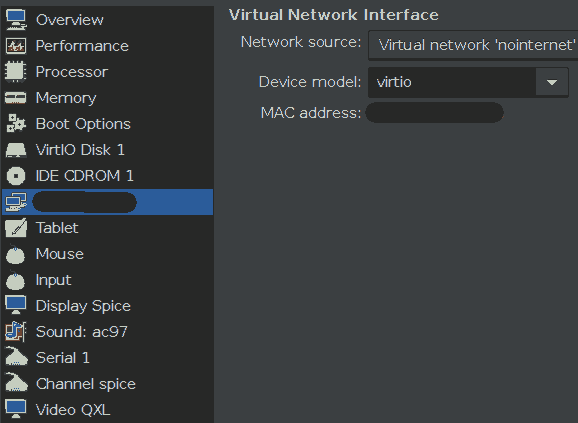
I prefer to use the “Virtio”-type of virtual devices, i. e. “Virtio”-bus for virtual HDDs and “virtio” for the network-card type. Without any testing, I expect those devices with VM-optimized guest drivers to give the highest performance and support the most advanced features. In order to use virtio-devices with Windows, you will need to install the guest utilities for Windows (see “Windows Guest Utils” below).
Also, for virtual displays I always choose “Video QXL”. If you want to try some advanced (and highly experimental, in my tests: unsuccessful) graphics acceleration, you might also be interested to select “VMVGA” to use VMWare’s graphics driver. As you can see in the picture, I install a virtual tablet which is essential for all mouse-enhanced OS, because otherwise the pointer on the guest system can get out of sync with the host’s GUI.
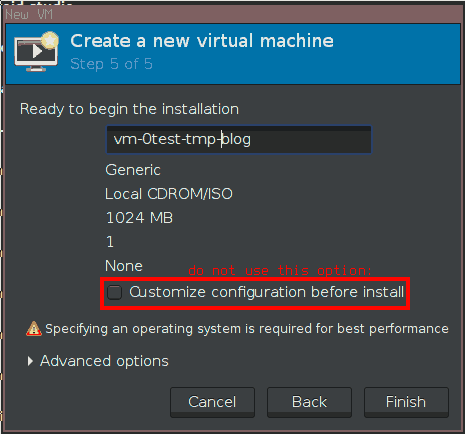
I suggest you to always configure the VM as much as possible before doing the installation. In order to do this, you need to shut down the VM once it was started after the setup initiated after creating a new VM. Only then, you can see and modify all of the virtual hardware (there is also a customization in the setup which will not allow you to configure everything). Be sure to also add a virtual CD drive and make it bootable under “Boot Options” for OS installation. For Windows guests, I never choose to copy the host CPU configuration. This originates from the idea, that I want to be able to migrate the VM to a new (or just another) machine without having to re-activate Windows. But as Windows ties it’s activation to some of the processor’s properties, I prefer to go for a generic model. As with the “virtio” preference (see above) I generally go for the generic “kvm64” option if possible (works for Windows XP). Alternatively I choose old CPUs which I imagine many (and all newer) systems can “provide” like “Nehalem” (for Windows 8.1) or “core2duo” (for Windows 10). If you are using AMD processors or require enhanced performance, you might want to choose differently and consider the “Copy host CPU configuration” switch.

I do not have recommendations on RAM and CPU amounts/counts but I generally recommend you to configure a lower “Current allocation” than “Maximum allocation”. I have yet to fully understand, what these mean, but I experienced the situation where a virtual Linux VM’s CPU and RAM count/amount could be increased while the VM was online up to the amount configured in “Maximum allocation”. If you have long-running or computationally intensive VMs, it might even be advisable to give the host’s maximum for “Maximum allocation” values.
For all options not mentioned here, I generally go for the defaults. See the specific sections below for recommendations for specific cases.
Virtual Networking
Virtual Networking is more difficult with Virt-Manager but also more powerful than with VirtualBox. While VirtualBox generally configures networking on a per-VM basis, Virt-Manager requires the creation of “Virtual Networks” which also need to be “Active” before they can be used by any of the VMs.
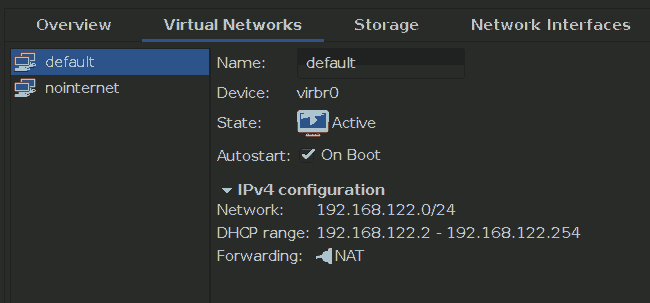
Generally, the situation is similar to VirtualBox: For every VM we need to decide if we want it to be separated from the host’s network via a NAT or if we want to make it part of the host’s network (“bridge”-mode) or if we want to restrict communication to be between virtual machine guest and host only.
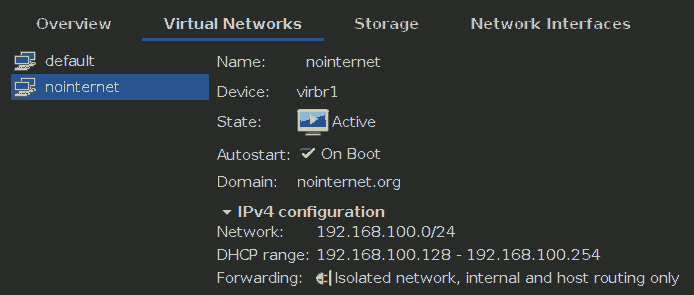
In order to separate VMs from the rest of the network, I have configured the virtual network “default” to be a NAT and in order to keep old operating systems (like Windows 2000 and Windows XP) away from the Internet, I have created a special virtual network “nointernet” as an “isolated network”.
Enabling VM saving
A feature I heavily use with any virtualization software is the ability to “save” a VM’s state and later restore it to the exact status it had when it was “saved”. This feature is similar to real computer’s “hibernation” (suspend to disk) feature but unlike that, “saving” a VM also works very well with linux guests and one can usually be very confident that even running/calculating applications can be paused and continued later this way. Finally, VM saving permits pausing a calculation, performing some other task and later resuming it. All in all, this feature is just essential.
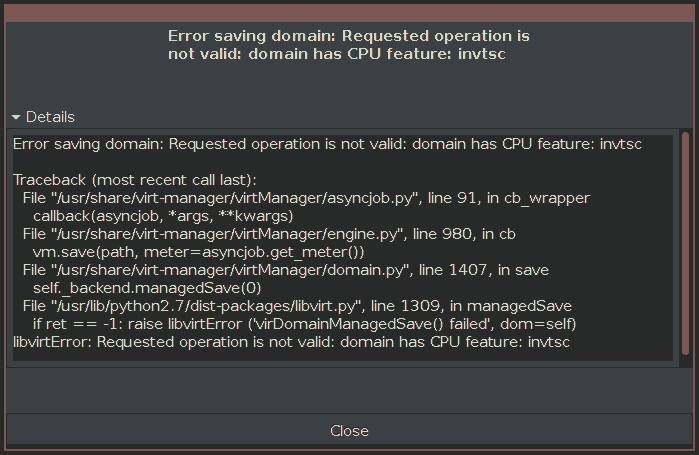
I was very surprised, to find out that KVM and Virt-Manager often give an error message when attempting to use this feature (which is in the GUI’s menu).
Gladly, the message explains the reason and it can be fixed by directly editing a VMs configuration file and then restarting the VM.
In order to fix it, it is recommended to invoke
virsh edit <VM-NAME> and search for
invtsc. Delete the corresponding line and VM saving should
work after restarting the VM.
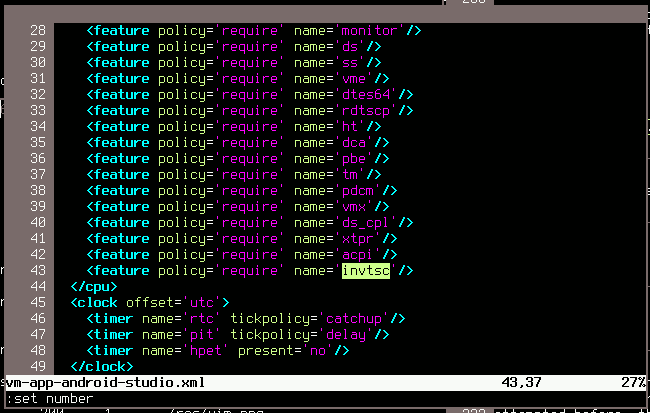
If you want to do this manually instead, open
/etc/libvirt/qemu/<VM-NAME>.xml and edit it as
suggested before. Then you need to restart the libvirtd service (First
stop the VM, then restart libvirtd, then start the VM).
Either of these methods require root permissions. The first method is
really preferable, because the service is not required to be restarted
but the manual variant is probably useful if you want to automatically
deploy VM configuration files…
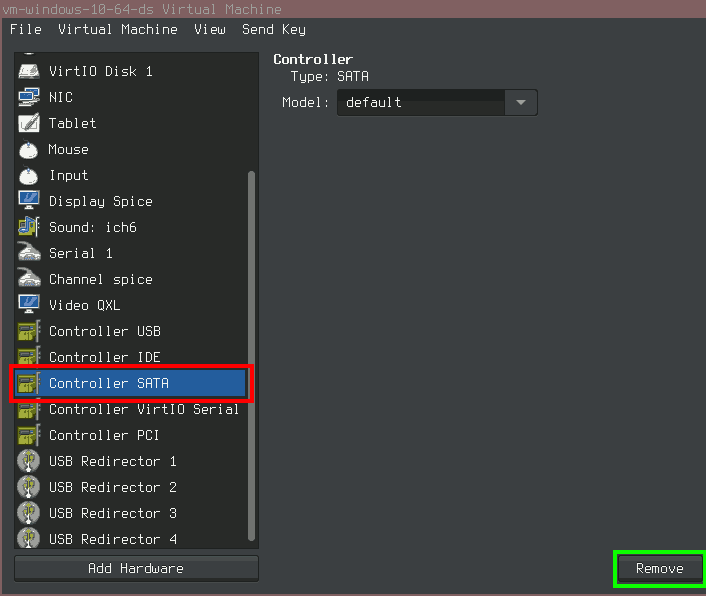
Update 2016/07/23: There is another nasty error which can occur upon saving the VM. It yields a similar error dialog as above but has the message: Error saving domain: internal error: unable to execute QEMU command ‘migrate’: State blocked by non-migratable device ‘0000:00:06.0/ich9_ahci’. This one seems to be pretty unknown around the web, the solution can be found in a Korean E-Book. I gather you might not understand Korean (I can’t understand it either), so Google Translate is useful. The solution to this error is simple: Remove all SATA controllers and SATA devices from the virtual machine.
Enabling Nested Virtualization on Intel CPUs
Shortly after transitioning to Virt-Manager and KVM, I wanted to be able to employ nested virtualization similar to how it was possible with VirtualBox before. This feature is not all that important, but there are certain use cases for it. Luckily, I found a blog-post (as of today, it only remains only as an archive version) which explains how to do it:
- Enable the host system’s kernel to do nested virtualization by
passing the parameter
nested=1to the kernel modulekvm_intel. To do this, check the status withcat /sys/module/kvm_intel/parameters/nested(should outputNfor not enabled, otherwise you do not need to continue with this step because it is already enabled). Then, save or shutdown all VMs and dormmod kvm_intel && modprobe kvm_intel nested=yto enable the parameter and then check the status again. - Store this parameter permanently by creating a new file below
/etc/modprobe.d(e. g./etc/modprobe.d/my-intel-kvm.conf) with this lineoptions kvm-intel nested=y - Enable the
vmxfeature for VMs. The easiest way to achieve this, is by selecting “Copy Host CPU configuration” under “Processor/Configuration” for each VM. Otherwise, you may also edit the VM’s XML configuration as described for “Enabling VM saving” and add a line with thevmxfeature.
When I tested this, these steps made it work but not very quickly… The nested VM’s performance is much slower than the “first-level” VM…
Improving Linux Guest Screen Resolution
Use “Video QXL” as recommended above. Generally, a few different
screen resolutions can then be selected with xrandr (to
list all) and xrandr --size 800x600 to select a specific
size. While this is what can be expected of any OS, the situation can be
improved by installing just two additional packages. The following are
the Debian package names, probably different for other
distributions:
xserver-xorg-video-qxlspice-vdagent
Just installing them, will not immediately improve the situation. The
spice-vdagent also has to automatically be started whenever
the GUI is run (and the X-server has to be restarted for the new
xserver-xorg-video-qxl driver to take effect).
For a Debian MDVL 64 VM, I have changed the ~/.xsession
to contain these lines:
spice-vdagent
exec i3
This way, the spice-vdagent is executed upon login and
just after that, the window manager is started. It is surely also
possible to use any other means of automatically running this.
spice-vdagent could also be launched manually if GUI access
is only rarely necessary or the VM is never rebooted.
Windows Guest Utils
Generally, it is difficult to install Windows directly on a “virtio” drive. Therefore, I recommend installing Windows on a virtual IDE drive and later installing the necessary drivers.
The steps are as follows:
- Install Windows on a virtual IDE drive
- Install the guest utils (see below for details)
- Shutdown Windows
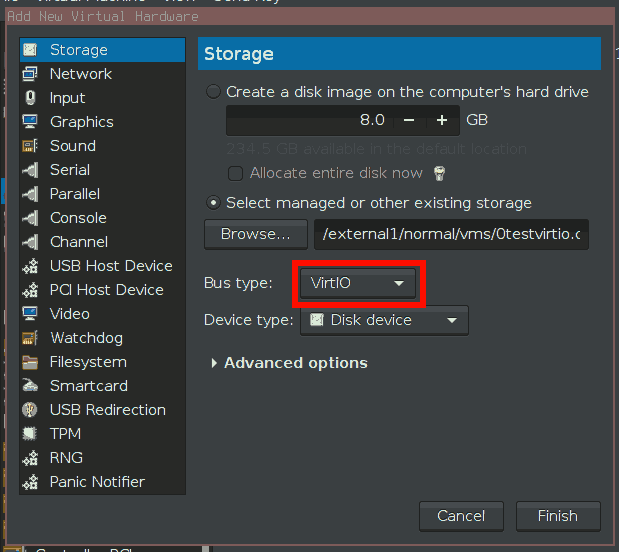
- Add a virtual Virtio-HDD to the VM.
- Start the Windows-VM.
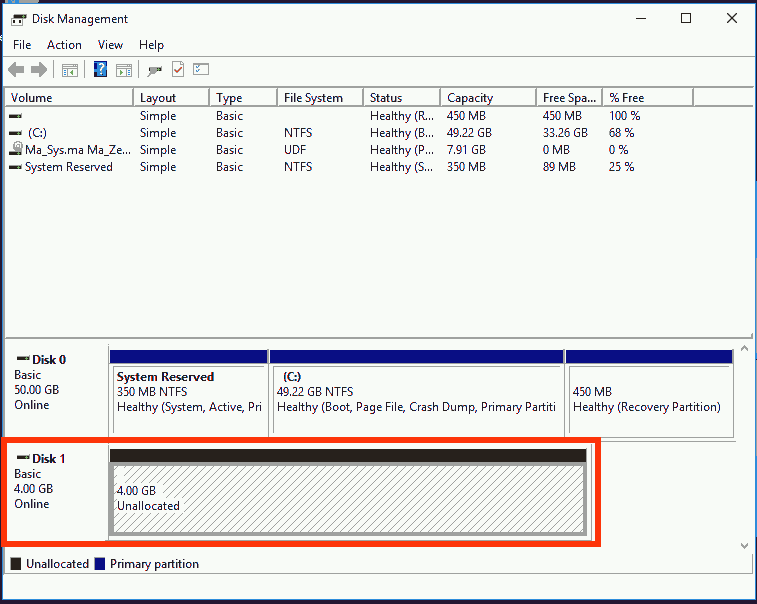
- Make sure, the new drive is installed correctly under Windows (Check
with
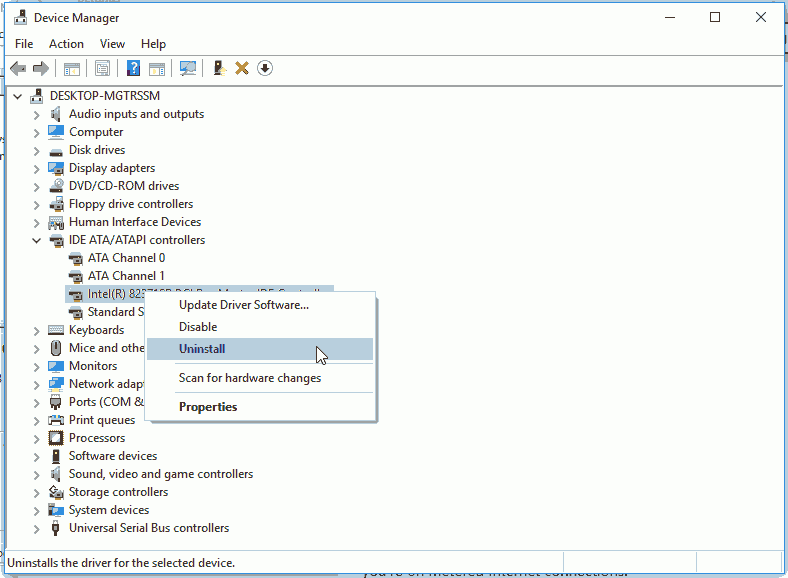
diskmgmt.msc). - Uninstall the IDE controller in the Windows device manager. This way, Windows will be able to start from a different drive type than before.
- Shutdown Windows.
- Change the drive type of the first virtual drive to “Virtio”.
- Remove the virtual drive added in step 4.
- Verify Windows starts correctly.
- If it does not work, switch the HDD back to IDE and re-add a virtual Virtio-HDD. Format it in Windows to see that it is really useable. Then continue with step 7.
If this was a bit too short of an explaination, see the pictures below for details on the different steps.
- Installing the guest utils
-
This is pretty easy as long as you get the right installer. Go to http://www.spice-space.org/download.html and look for a
spice-guest-tools-0.NNN.exeunder “Windows binaries”. It should point you to an URL like http://www.spice-space.org/download/windows/spice-guest-tools/ where you can download the.exe-installer. Although the page suggests this is mainly for improved video (which it also does), the installer also installs network and HDD drivers for “virtio” devices.
Windows XP: Shared folders
A feature I very much liked of VirtualBox was the “Shared Folders” option. This way, I could expose a directory on the host computer to the virtual machine without giving the VM network or Internet access. An important advantage of “Shared Folders” over virtual “external HDDs” was the ability to read and write to shared folders from both systems, the host and the guest, at the same time. This way, I could run a compiler inside the VM and the editor to enter the code outside the VM without any time difference from a local compiler.
Unfortunately, KVM + Virt-Manager do not support this for Windows guests. For Linux and probably other operating systems, there is a facility called “Filesystem passthrough” which does just about the same thing as “Shared Folders” in VirtualBox. I have not tested that feature, but I expect it to “just work” for Linux guests. For an example of how to use this, check http://www.linux-kvm.org/page/9p_virtio.
For Windows guest systems, we are left to “create our own” means of sharing files between host and guest. A very user-unfriendly means of achieving this is probably the following:
- Adding a second virtual HDD to the VM
- Writing files to the virtual HDD in the VM
- Unmounting the virtual HDD in the VM
- Accessing the virtual HDD from outside the VM (read/write)
- Mounting the virtual HDD in the VM
- Continue with Step 2.
I have actually experimented with this and the result is in two words: Not usable. Variations of this can be thought (like USB-passthrough of a real USB-Stick or such) but all of them share the same issue: There is no simple concurrent accessing the shared files.
Therefore we are left with another option often suggested when searching the web for keywords like “kvm share files windows guest”: Running a server on our host system and making the guest system access that server in order to exchange files.
The most commonly reported idea is setting up a Samba-Server, it seems there is a means of setting this up “on the fly” if configured correctly, see the discussion at ServerFault for details.
I do not like the idea of installing a server just to create Windows shares which can then be accessed by Windows guests. I did not like the idea of the guest being able to access a server on the host at all… but as there does not seem to be another solution yet, I want to use the SSH server which I already run on all host systems and which I know how to configure (unlike Samba).
Unlike the Samba-solution which works with many Windows versions, at least Windows XP to Windows 10, the SSH-filesystem solution probably only works with Windows XP (I have only checked it with Windows XP). If you are on a newer Windows version and want to use SSH and have checked the filesystem solution does not work, you might consider using a tool like WinSCP in order to transfer files between host and guest. Or see, if you can use a newer “Dokan” and “Win-SSHFS”: https://github.com/dokan-dev/dokany/releases
The solution I took, uses a set of programs similar to the Linux
sshfs to connect a Windows drive letter to a SSH
connection. In order to set this up, you need:
- Dokan 0.6.0, Softpedia-Download
- .NET Framework 4.0, Microsoft-Download
- win-sshfs 0.0.1.5, Googlecode-Downlaod (seems to be offline):
https://win-sshfs.googlecode.com/files/win-sshfs-0.0.1.5-setup.exe
Newer versions, except for the dot-Net Framework are probably OK as well, if any of the links fail, notify me because (1) I still have the files, so you need not be stuck at this stage and (2) I may attempt to update the links if it is just that the download location has changed.
Compare the SHA256 checksums if you are not sure you have the correct setup files:
dokaninstall_0.6.0.exe |
a92ebb9f5baa83aa33a186d329eed2a2d063448432584f5bd88fd53bd44c0b3b |
dotNetFx40_Full_x86_x64.exe |
65e064258f2e418816b304f646ff9e87af101e4c9552ab064bb74d281c38659f |
win-sshfs-0.0.1.5-setup.exe |
2dee73dcfc449eea479014ee6c31839630618705f976e6bd12fd82c7e465adb3 |
Then, install these programs in the Windows guest. Create a key for the Windows guest to access your server via SSH. Encrypted keys (needing a passphrase) do not always work which is why I recommend you to create a special user for the virtual machine and create a separate key for that user so that it’s access permissions can be limited.
I have noted these points to setup the “Linux-side”
- Create a new user:
adduser vmuser - Disable login for that user:
passwd -l vmuser - Install/Add key
id_rsa.pubto/home/vmuser/.ssh/authorized_keys - Install key
id_rsato the VM
A key-pair can be created with
ssh-keygen -b 16384 -t rsa (needs some time because 16384
is a large key length by current standards). You can not remember the
key anyway, so why not go for a longer one ☺
Having installed all the programs on Windows, you should be presented with a small yellow icon in the task bar. Click on it and you will get a window where you can configure connections.
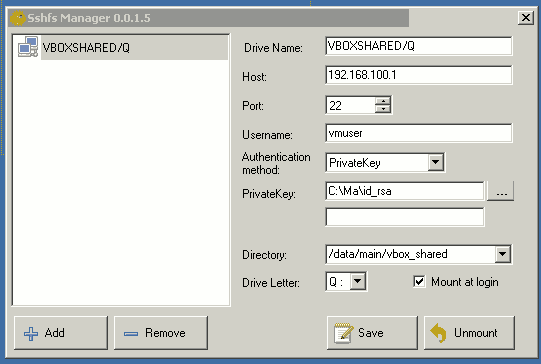
As you can see, configuration is pretty straight-forward. Just enter the details every SSH client needs IP-Address, Port, Username and authentification. In order to configure the public key authentication, just select “PrivateKey” and give the path of your private key file. The field below the file is for a password – when I attempted to use an encrypted key, it gave me an error message saying that AES was not supported or such. Thus, I did not use an encrypted keyfile. The “Directory”-field refers to the host system and the “Drive Letter” is for the Windows guest. Finally, you can decide to automatically establish the connection or not.
Once setup, it almost feels like with VirtualBox’ “Shared Folders”
before. However, there is a network connection. And once you
“Save” the VM and reboot the host, then “Restore” the VM, it will have
lost connection (Windows is not immediately realizing this) and you will
have to take some effort to restart the DokanMounter-service and the
win-sshfs.exe.
I did not yet manage to improve this procedure beyond clicking a few error messages and waiting for successful connection multiple times… it is probably faster to just shut down VMs which use Win-SSHFS instead of “saving” them.
After the transition
In summary, the transition provided a few benefits but also resulted in new problems. While there had been problems each time a transition had been attempted before, this time, they could be reduced to a usable minimum.
Still, this also means that as long as you are using VirtualBox and do not experience stability or licensing issues, there is not much of an incentive to switch.
Improvements archieved by transitioning to KVM + virt-manager
- Running a VM no longer opens a graphical console by default. While this could be considered a minor point, it enhances usability very much not to pop up a window for just starting up a VM.
- Shutting down VMs is more reliable, because whenever the outer system is shut down, all VMs are automatically shut down via ACPI signals as well. This is very convenient.
- KVM (like VMWare) supports memory ballooning. This means, that not all RAM assigned to a VM is used on the host system. Instead, only the memory actually used by the guest is consumed on the host. It should still be noted that this feature is not as efficient as VMWare’s implementation.
- Accessing VMs running on remote machines via “consoles” showing the graphical content and allowing to startup/configure/send special keys is possible similar to (but not as complex and not as mighty) VMWare vSphere.
- Virt-manager does not rely on QT. This finally opens the way to ban all QT applications from MDVL reducing the OS’ disk-space usage by a huge amount and also enhancing RAM usage by no longer loading multiple GUI frameworks.
Unsolved issues and new problems
- It is generally not simple to add virtual CDs and DVDs to running
VMs. This might be considered a minor annoyance but is really a hassle
because the virtual DVD to be used most often is Ma_Zentral 12 which is
also bootable and thus it is required to enter
hdon every VM startup to continue booting. - Although support for this in Linux-guests is probably soon to be available, KVM still lacks the ability to simply accelerate 3D-rendering in Windows-VMs. It has not been tested if it might be possible to add a second graphics card and use the PCIe-passthrough/virtualization facility to make the real hardware available to the VM.
- It has been noted that even with good (probably not the best) configuration we notice a degradation in the guest OS’ GUI performance as long as no additional software is installed on the guest. As useful software exists for Windows and Linux guests, this is not so much of an issue. And it has to be noted that VirtualBox was slightly better without the guest addons than KVM but still not perfect. Any virtualization solution performs best with the guest tools installed. (Who would have thought…)
- Guest operating systems experience multiple issues if saved and later restored. This function was much more reliable with VirtualBox and it is often required to fiddle with libvirt-configuration files in order to enable the feature in the first place.
- “Shared folders” for Windows-guests are not available with native KVM technology. Thus, some sort of server services on the host have to be used and of course this does not play well with saving and restoring running VM instances (because the VM believes the network connection still exists but the host does not even know that connection). This has always been my most problematic point for a transition to KVM and now still proves to be a huge degradation over the situation before.
Although this has often been claimed, VM performance could not be verified to be largely improved or degenerated. KVM and VirtualBox (and VMWare) all perform just about equal in terms of CPU performance (sorry, no accurate measuring here).
For RAM usage it can definitely be said that VMware performs best, KVM performs OK and VirtualBox uses a lot of memory on the host system. (I often recall, although I have unfortunately not made any screenshot of this, the situation where I ran a Windows XP VM under VMWare and had a lower application-used memory size on the host-system than Windows XP memory usage as reported by the task-manager. I know that comparing these values is not “correct” but this can be interpreted as “guest uses more memory than host” and that is a very nice idea, even if it is not the whole truth ☺ ).
In terms of disk I/O I do not have any measures, which is why I can not tell. Virt-Manager offers a few options on I/O caching which sounded like they would not likely improve the situation over the default, but those might probably help in specific scenarios.
Virtual networking with KVM is often faster (by orders of magnitude like 40 MiB/s with KVM and 4 MiB/s with VirtualBox) than in VirtualBox, I do not have any comparison with VMWare here. Also, this highly depends on the type of virtual network card, virtual network configuration (like NAT) and where the actual target is located (on the same machine or remotely on the network).
All in all, I would summarize my performance impressions as: KVM is probably slightly better than VirtualBox, VMWare is probably better than both and it does not matter in the general case. In specific cases, however, it can not generally be said that one is faster than the other. It probably highly depends on the scenario and VirtualBox can probably not be recommended for networking-intensive scenarios. If RAM is important, VMWare is probably the best.
Information to be added
- Online Image Resizing → https://serverfault.com/questions/122042/kvm-online-disk-resize
- Recommended shared folder settings for Linux / how the settings compare…
- (NFS) remote setup: need to put a key for local user as well as root
(
~/.ssh/config). Or alternatively (?) need to run ssh-agent https://lists.debian.org/debian-user/2022/04/msg00042.html <cpu mode='host-passthrough'/>for nested virtualization.- PCIe pass-through:
intel_iommu=on, pass all parts of the device. - VMS do not shutdown completely (permission denied if doing this with virsh) Need to amend AppArmor profile → https://unix.stackexchange.com/questions/416345/kvm-can-not-destroy-vm-permission-denied-apparmor-blocking-libvirt
- Docker shared network device
- SSD performance: VirtIO-SCSI Bus (virtual SCSI HDD) and then check Defrag to see thin provisioned drive. / Remove and re-add to avoid no bootable device found error.
- Error message: Error starting domain internal error process exited while connecting to monitor Must specify either driver or file … can be solved by setting cache to Hypervisor Default for all empty CDROM drives. This is sad because migration features require none to be set which cannot be used while the virtual CDROM drive is empty… → https://bugzilla.redhat.com/show_bug.cgi?id=1377321
- Recommended virtual CPU models to be used: https://www.berrange.com/posts/2018/06/29/cpu-model-configuration-for-qemu-kvm-on-x86-hosts/
- Automatic resolution chainging in VMs: Install
qemu-guest-agentand set video to VGA (!). Ifspice-vdagentis running it should immediately resize to the window size. - “Error starting domain: unsupported configuration: Emulator /usr/bin/kvm does not support machine type pc-i440fx-2.1” https://serverfault.com/questions/955011/afer-upgrading-qemu-unsupported-machine-type-pc-i440fx-3-1 Edit XML and replace pc-i440fx-2.1 with q35. How to convert automatically: https://docs.redhat.com/de/documentation/red_hat_enterprise_linux/10/html/configuring_and_managing_windows_virtual_machines/converting-virtual-machines-to-q35
Convert to qcow2
http://www.agix.com.au/blog/?p=2696
qemu-img convert -f raw -O qcow2 /home/libvirt/images/vmguest1.img
                /home/libvirt/images/vmguest1.qcow2
In case Webcam Flickers in Zoom
- Situation: Combination Zoom + Logitech C920 redirected into VM.
- Problem: Video telephony flickers (seen on both sides of the connection!)
- Solution: Change the VM’s USB redirector type from USB3 to USB2.
Set RTC to UTC for VM
Edit XML section from <clock offset="localtime">
to <clock offset="rtc">, cf. https://www.reddit.com/r/linuxquestions/comments/84i2yu/qemukvm_virtual_computers_clock/
Legacy notes about VirtualBox
Get USB working in VirtualBox
http://www.jeremychapman.info/cms/get-usb-working-in-virtualbox-under-debian-and-ubuntu
cat >> /etc/fstab <<EOF
none /proc/bus/usb usbfs devgid=INSERT_VBOXGID_HERE,devmode=664 0 0
EOF
Virtualbox 3D
bash-4.2$ ls -l /usr/lib/dri/swrast_dri.so
lrwxrwxrwx 1 root root 39 Nov 20 10:39 /usr/lib/dri/swrast_dri.so ->
                /usr/lib/xorg/modules/dri/swrast_dri.so
Virtualbox Compacting
http://superuser.com/questions/529149/how-to-compact-virtualboxs-vdi-file-size
Windows: sdelete -z
Linux:   Different means (zerofree or big4 -z)
Outside: VBoxManage modifyhd thedisk.vdi --compact