Abstract
This page collects my notes regarding the setup of an AES67/RAVENNA based audio network. The technology allows constructing a lossless (and high-res capable) connection to audio equipment using standard Gigabit Ethernet components such as network adapters, switches and network cables.
Specifically, in this notes I explore the possibility to connect a Linux Server (source) to a pair of Neumann KH 120 II AES 67 W active speakers (sinks) with the intention to minimize noise and conversion effects from the source material (FLAC files) to the speaker DSP.
So far I only have a limited understanding of this technology. As a
result, this page may be quite incorrect. Please submit corrections to
info@masysma.net!
Test Network Setup

I conduct tests using a dedicated audio network 192.168.10.0/24 attached to a dedicated Ethernet port on PTE5 – a Fujitsu Primergy RX1330 M1 server used for testing here due to the convenience of multiple Ethernet ports. Also, using a separate machine avoids breaking anything when experimenting with the kernel modules.
As a network switch I use Dell PowerConnect 2848 for testing because I already have it and it can be managed to disable Green Ethernet features (automatic power-down of ports can hurt audio latency). A switch should also support QoS features but I did not configure them in any particular way for my tests.
Known working switches are listed here: https://merging.atlassian.net/wiki/spaces/PUBLICDOC/pages/4817447/Network+Switches+for+RAVENNA+-+AES67.
I do not advise buying the PowerConnect 2848 for audio purposes because it is actively cooled and makes some annoying noise louder than the Fujitsu Server used for testing here.
On the software side, I used interface eno1 and setup
dnsmasq to act as a DHCP server. During the tests, I
disabled the firewall (gufw). The network settings were as
follows:
/etc/network/interfaces
allow-hotplug eno1
iface eno1 inet static
    address 192.168.10.1
    netmask 255.255.255.0
    network 192.168.10.0
    broadcast 192.168.10.255
/etc/dnsmasq.conf
domain-needed
bogus-priv
interface=eno1
bind-interfaces
domain=masysma.org
dhcp-range=192.168.10.50,192.168.10.150,12h
Software Choices
To have a Linux machine send audio via AES67, the following two components are necessary when using ALSA:
- Kernel Driver. A free driver is provided by Merging Technologies here: https://bitbucket.org/MergingTechnologies/ravenna-alsa-lkm/src/master/
- Userspace Daemon. One can use the proprietary userspace daemon by
Merging Technologies or the free userspace daemon by Andrea Bondavalli.
The proprietary one is called
Merging_RAVENNA_Daemonand included with the kernel driver. The free one can be found at https://github.com/bondagit/aes67-linux-daemon.
AES67 Limits with Neumann KH 120 II AES67 W
So far I have observed the following limits when operating the speakers using AES67.
- The configured playback frequency can only be set to a fixed value. Valid frequency settings are: 44.1kHz, 48kHz, 88.2kHz, 96kHz (cf. https://www.neumann.com/en-en/products/monitors/kh-120-ii-AES67/). Some 192kHz high-res material would thus require downsampling to play back. Also, the choice cannot automatically be changed with the source stream (on the speaker side). For practical uses with mixed input formats it seems one would set the speakers to 96kHz and resample all of the input material to that frequency in order to play back mixed material?
- Analog volume control is not available. This seems to be a protocol limitation of AES67, but as far as I understand there is no way to change the output volume dynamically except by digitally processing the audio data to play at a lower volume. Per my understanding a digital volume reduction also comes with a loss of quality/dynamics because the least significant bits are shifted away to reduce the volume, cf. https://www.head-fi.org/threads/dac-volume-control-lossless.964681/.
It might be possible to lift the volume control restriction when using the MA 1 Monitor Alignment software because IIUC it saves a configuration in the speaker that could include the AES67 source selection and if that is true, it might be possible to combine AES67 playback and JSON-API-based volume control. I have not tried this yet, though.
Kernel Tuning
AES67 aims at low-latency audio transport (think of much less than 10ms latency). Typical Linux PCs may struggle with the hard timing requirements of the protocol. Various sources propose some kernel parameter tuning including compile-time settings. In my experiments, I unconditionally set the following settings without checking if they had any positive or negative influence on the test outcomes:
sysctl -w kernel.perf_cpu_time_max_percent=0
sysctl -w kernel.sched_rt_runtime_us=1000000
echo performance > /sys/devices/system/cpu/cpu0/cpufreq/scaling_governor
Speaker Hardware Settings
Set the switches on the back of the speakers as follows:
- INPUT SELECT = AES67
- CONTROL = LOCAL
I find it slightly confusing that you must not set the CONTROL = NETWORK because this switches the speakers to MA 1 mode which is intended for calibration but not for AES67 playback although AES67 works over network!
Getting Started using the Proprietary Daemon
I conducted my tests on Debian 12 Bullseye (Debian stable at the time of this writing). This seems to be too new a distribution to run the proprietary daemon out of the box. The following describes some notes about getting the setup running despite these hurdles. Since these instructions were created after the fact, they may miss some steps, though.
Compiling and Startup
Download the driver and proprietary daemon repository:
git clone https://bitbucket.org/MergingTechnologies/ravenna-alsa-lkm.gitIn my case I needed to patch the driver to cleanly compile on Debian
12. I replaced #include <stdarg.h> with
#include <linux/stdarg.h> in
driver/MTAL_LKernelAPI.c. Effectively, this corresponds to
the following patch
diff --git a/driver/MTAL_LKernelAPI.c b/driver/MTAL_LKernelAPI.c
index 5b169fe..fc4b889 100644
--- a/driver/MTAL_LKernelAPI.c
+++ b/driver/MTAL_LKernelAPI.c
@@ -91,7 +91,7 @@ void free (void *__ptr)
     vfree(__ptr);
 }

-#include <stdarg.h>
+#include <linux/stdarg.h>
 int MTAL_LK_print(const char *fmt, ...)
 {
     va_list args;
Compile the driver
cd ravenna-alsa-lkm/driver
make
This outputs MergingRavennaALSA.ko which can be loaded
into the running Kernel as follows:
insmod MergingRavennaALSA.koSome settings need to be tuned for the proprietary daemon. They can
be set in file Butler/merging_ravenna_daemon.conf. My
settings look as follows:
interface_name=eno1
web_app_port=9090
tic_frame_size_at_1fs=48
config_pathname=/var/alsa-aes67-driver/butler.config
web_app_path=/media/ravenna-alsa-lkm/Butler/webapp
To run the proprietary daemon, I used an Ubuntu 18.04 docker container with most of the container restrictions removed as follows:
docker run --net=host -it --privileged -v $(pwd)/ravenna-alsa-lkm:/media/ravenna-alsa-lkm ubuntu:18.04
apt-get update
apt-get install libdbus-1-3 libcurl3 libavahi-client3
mkdir /var/alsa-aes67-driver
adduser -u 1000 linux-fan
chown linux-fan:linux-fan /var/alsa-aes67-driver
cd /media/ravenna-alsa-lkm/Butler
su linux-fan
./Merging_RAVENNA_Daemon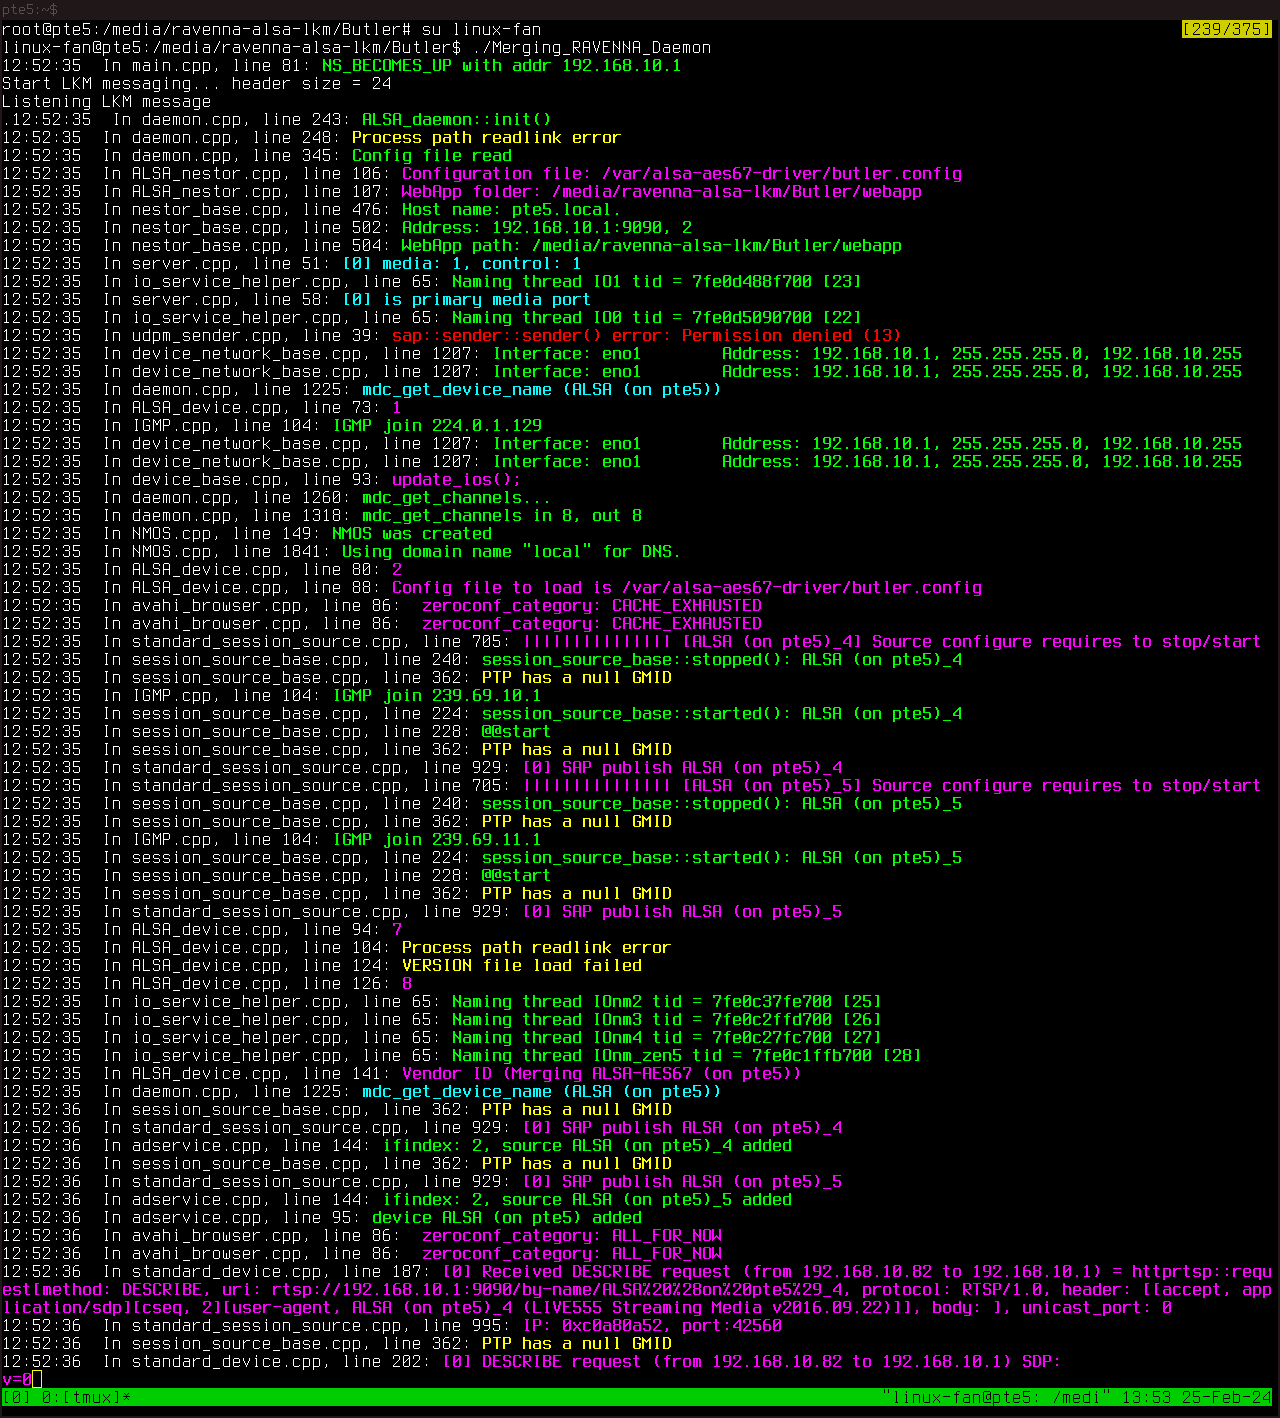
Daemon Web Interface
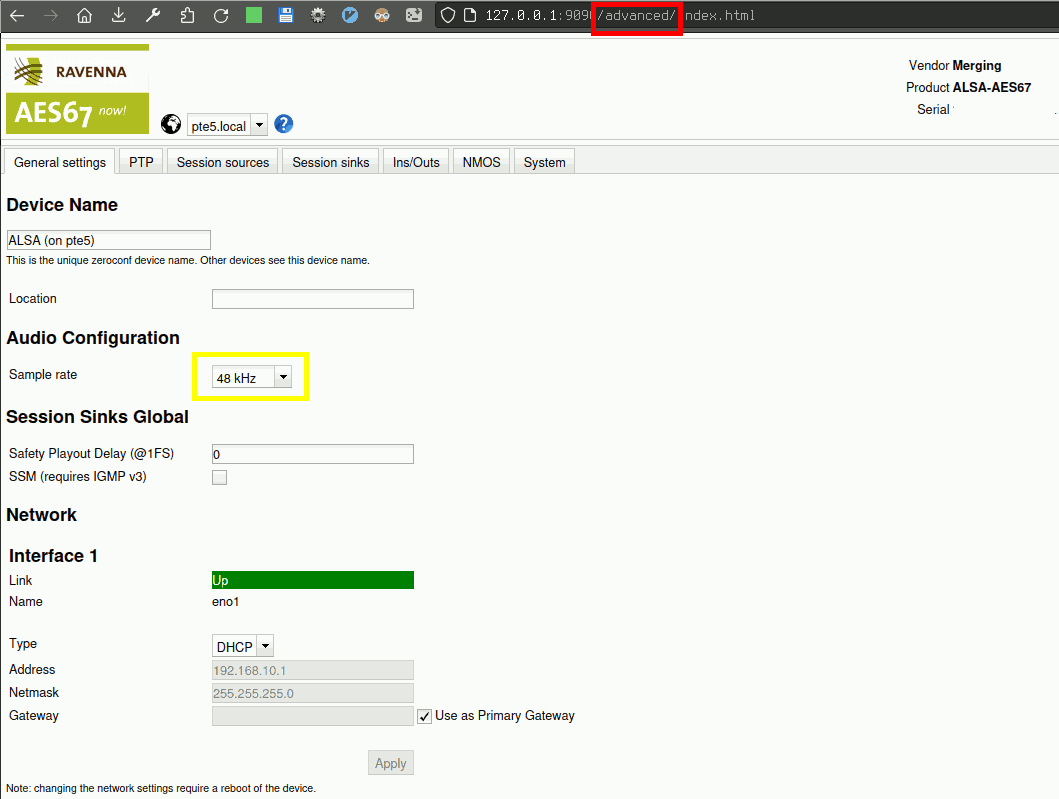
The daemon’s web interface can be accessed at port
127.0.0.1:9090/advanced. If you forget the advanced
subdirectory, a 404 not found HTTP code is returned.
I conducted my first tests with 48kHz sample rate and configured the web interface settings accordingly. The following screenshots show my configuration that got some sound out of the speakers in the end. For most of the settings, I do not know what exactly they are doing. I highlighted those that seemed to be very important in red and those that may have made a difference in yellow.
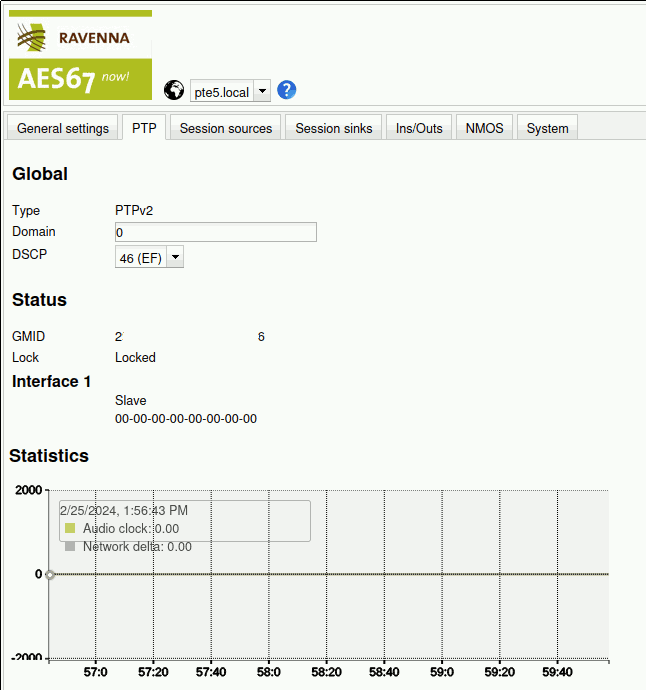
The DSCP setting looks important, but I did not have to change it, nor do I understand what it does exactly…
Once the system is up (i.e. speakers connected etc.) the status on all components must indicated locked to show that the time synchronization works.
There are some suggestions that one can setup the clock master on the
host Linux system (using something along the lines of
ptpd -CV -d 0 -M -i eno1), but for me this did not work
reliably. I chose to use one of the Speakers as Clock Master
instead.
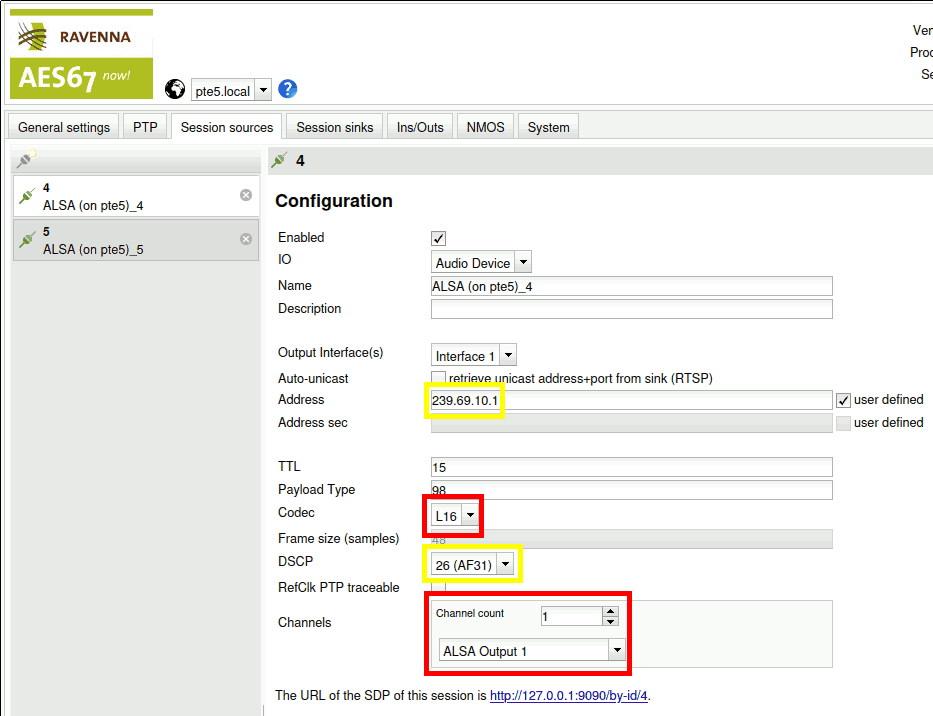
There is one thing to keep in mind when configuring the audio sources: The speakers only ever play the first channel of an AES67 stream. Intuitively, one would create one stream with two channels, but to adjust to the limitation of the speakers, one should instead create two streams with one channel each!
I read about using address prefix 239.69. online
somehwere and it may be necessary to set this.
Initially it seemed that codec must always be set to L16, but for 96kHz I later chose L24 successfully, too. Again, I don’t know what the DSCP setting is about, but the shown value worked for me.
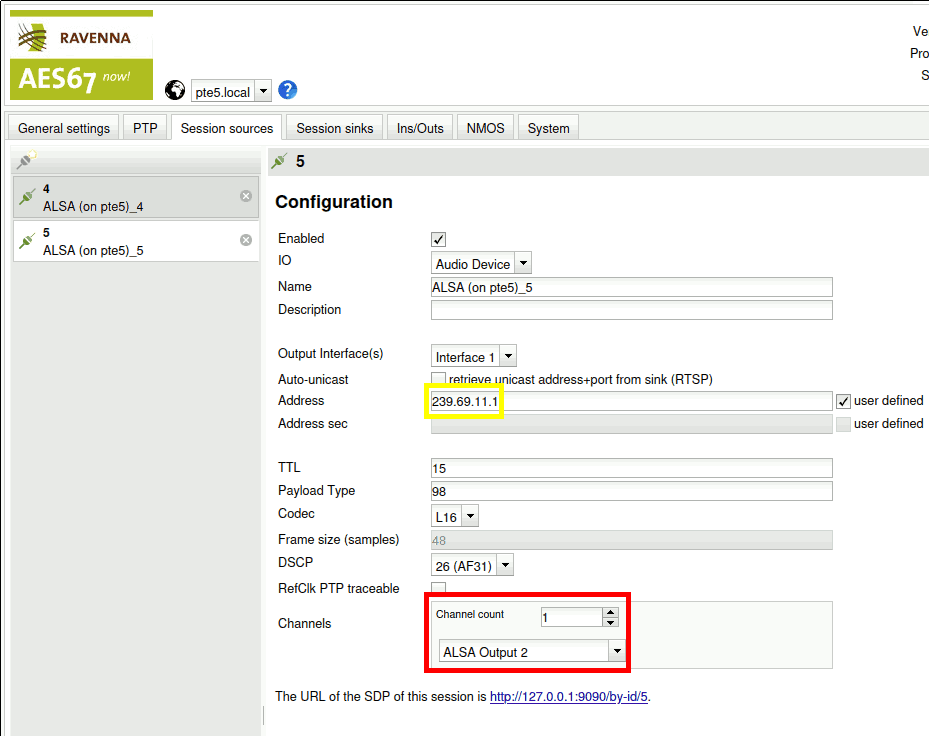
The important thing to change for the 2nd stream (corresponding to the right speaker) is to set a different addres and ALSA Output 2. The remainder of settings should be identical to the left stream.
Left Speaker
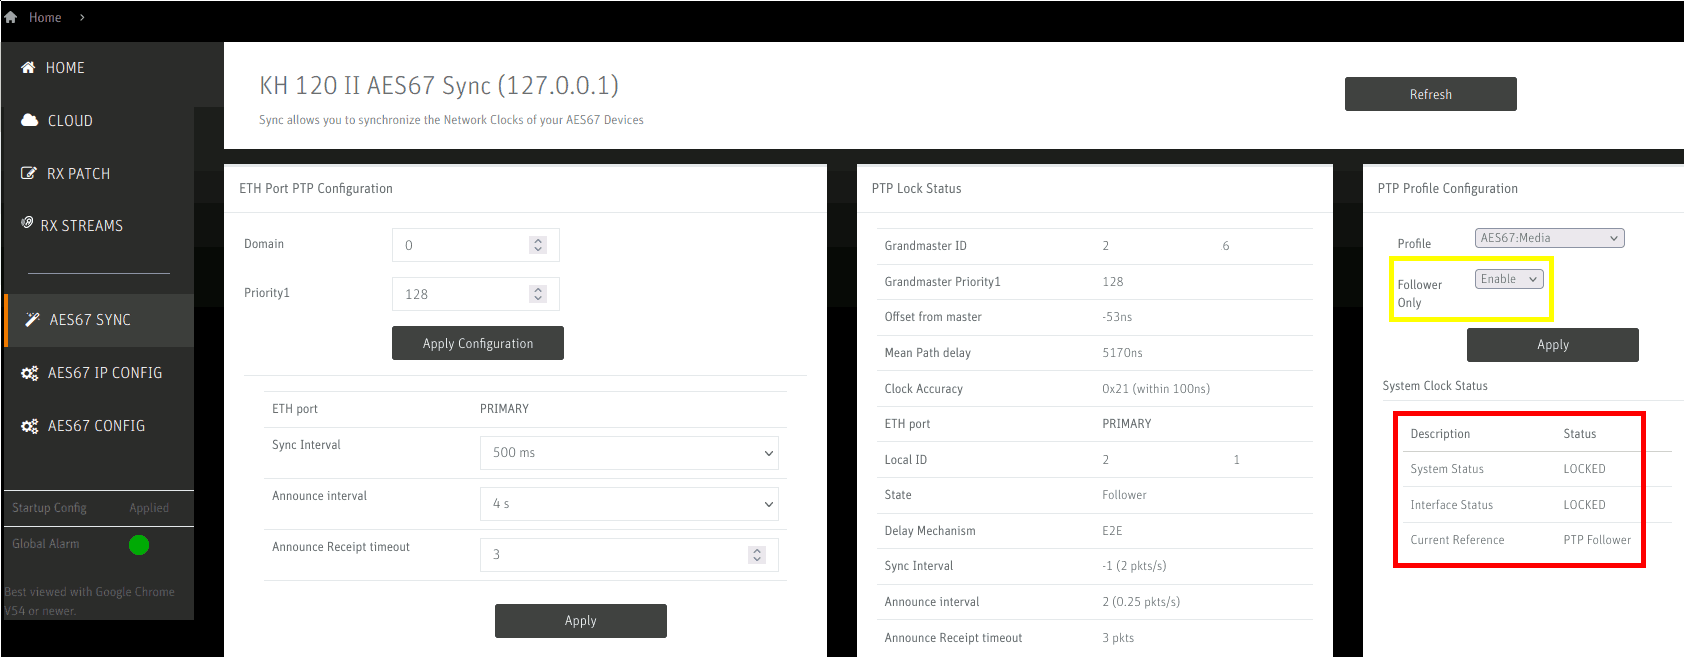
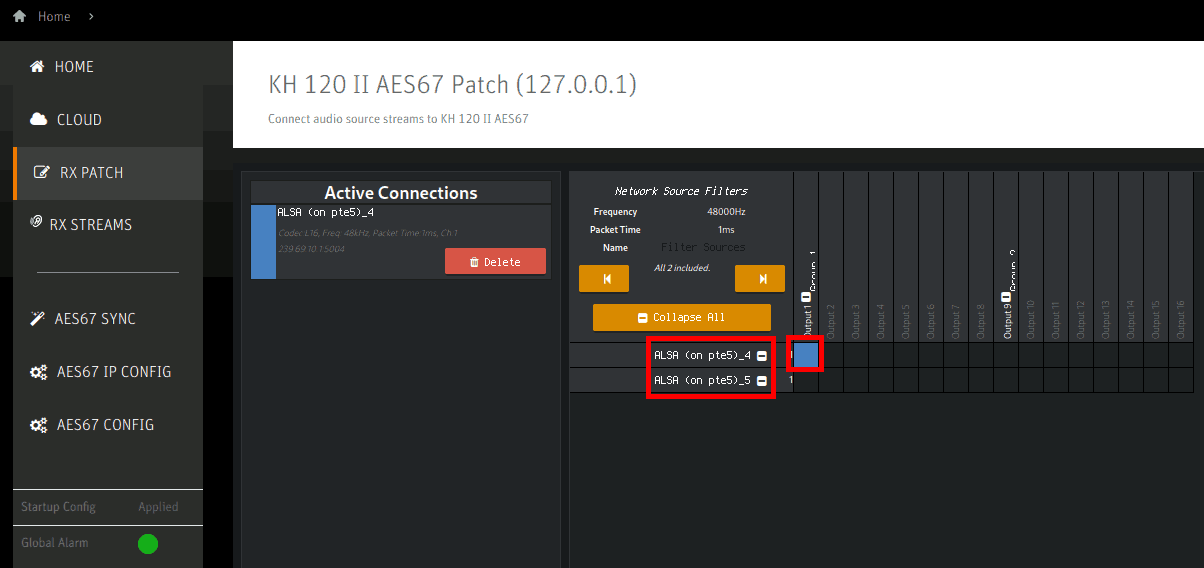
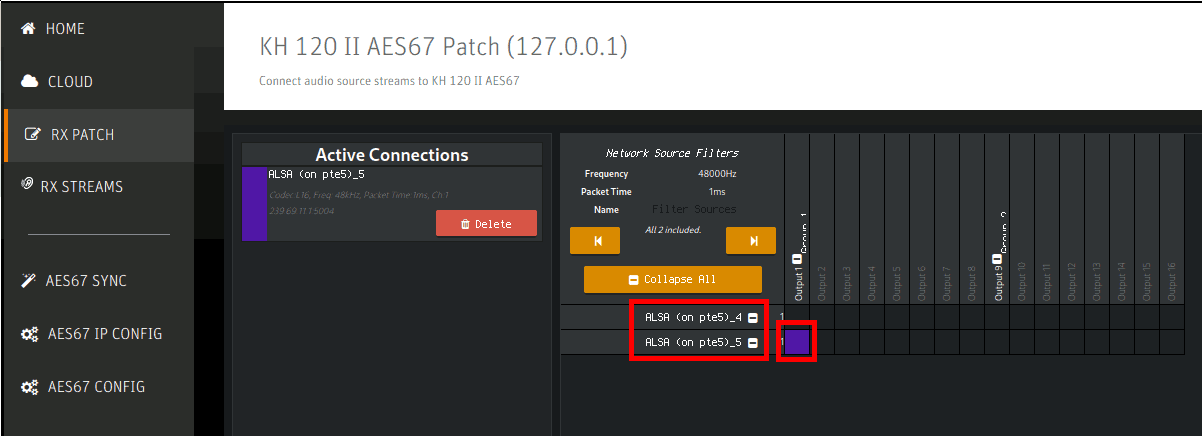
The web interface of the speakers can be opened on port 80 of the respective speaker IP. The most important panels are AES67 SYNC that shows whether the time synchronization works and RX PATCH which shows which source stream is assigned to the given speaker and also if the stream is still alive by an indirect reporting mechanism: When something is off, only the assigned streams are shown, when everything is working fine, the stream for the other speaker should be visible on that panel, too! If any of the streams are hidden (i.e. it displays something else than All 2 included) then most likely the sampling frequency is configured differently on the source and the speaker and it refuses to assign this source to the speaker output by hiding it from the possible choices.
Right Speaker
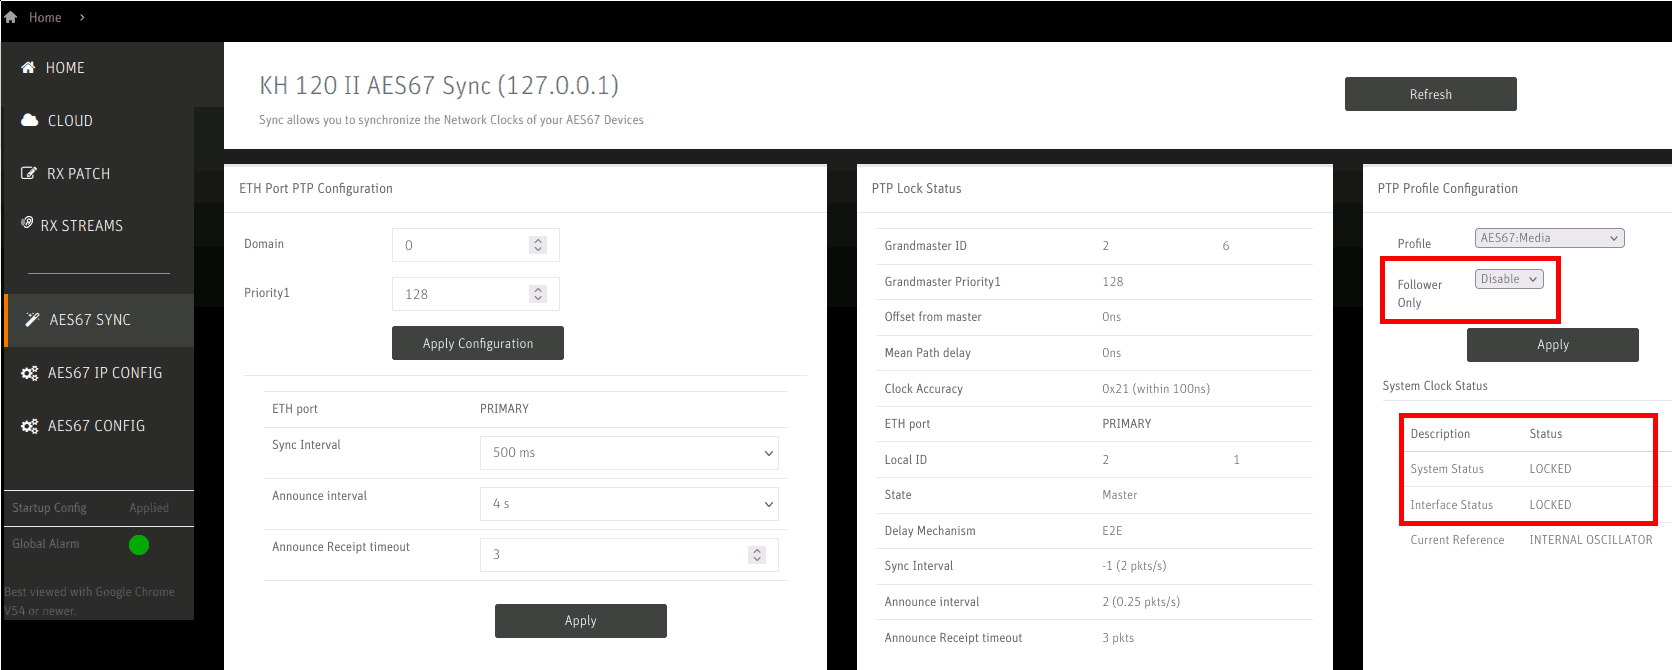
In my tests, I configured the right speaker as clock source and hence disabled the Follower Only mode for it. It then automatically detects that it could be a good clock source and establishes itself as such.
Playback
If everything has been established successfully, one can check the
functioning of the speakers with the speaker-test
application. Be prepared to quickly stop it (CTRL-C, CTRL-) because it
plays at full loudness (!)
speaker-test -D hw:RAVENNA -r 48000 -c 2This was much too loud for testing listening to music, but I found a way to digitally reduce music volume for playback:
ffmpeg -i 01_16_breakaway.flac -filter:a volume=0.013 /tmp/test48low.wav
aplay -D hw:RAVENNA test48low.wav
Here, the filter digitally reduces the volume to 1.3% of the original (!) and this made for a sufficiently low playback volume for that song in my testing environment. Note that you must use a WAV file with 48kHz for the test to work.
Volume Control doesn’t work
The proprietary software is advertised to permit Volume Contol which was my reason for trying it out in favor of the free variant first.
However, per my preliminary understanding this volume control can only work with MERGING+NADAC https://nadac.merging.com/product/merging-nadac. Specifically this means that it doesn’t control the volume of the Neumann speakers.
Tests were performed by changing the volume of the RAVENNA card in
alsamixer. No effect of the volume change indicated in the
TUI could be heard.
Getting Started using the Free Daemon
For the free setup, the following instructions assume a configuration with 96 kHz sample frequency.
Compiling and Startup
Although both daemons connect to the ALSA driver by Merging, running the free daemon needs requires applying some patches to it. To smoothly allow this, it includes download instructions for the driver. When switching from the proprietary daemon setup, it is thus necessary to unload the ALSA driver first:
rmmod MergingRavennaALSAAlso, there are some additional dependencies to install:
apt-get install libavahi-client-dev libboost-test-dev libboost-program-options-dev libboost-log-dev libboost-thread-dev libboost-system-dev libboost-dev clangDownload the free daemon
git clone https://github.com/bondagit/aes67-linux-daemon
cd aes67-linux-daemon
Compile it and have it download required components
./build.shThis should produce two artifacts:
3rdparty/ravenna-alsa-lkm/driver/MergingRavennaALSA.ko
daemon/aes67-daemon
Load the Kernel Driver
insmod 3rdparty/ravenna-alsa-lkm/driver/MergingRavennaALSA.koConfigure the Daemon (daemon/daemon.conf)
{
  "http_port": 8080,
  "rtsp_port": 8854,
  "http_base_dir": "../webui/dist",
  "log_severity": 2,
  "playout_delay": 0,
  "tic_frame_size_at_1fs": 96,
  "max_tic_frame_size": 1024,
  "sample_rate": 96000,
  "rtp_mcast_base": "239.69.1.10",
  "rtp_port": 5004,
  "ptp_domain": 0,
  "ptp_dscp": 34,
  "sap_mcast_addr": "239.96.255.255",
  "sap_interval": 3,
  "syslog_proto": "none",
  "syslog_server": "255.255.255.254:1234",
  "status_file": "./status.json",
  "interface_name": "eno1",
  "mdns_enabled": true,
  "custom_node_id": "",
  "node_id": "AES67 daemon a8c0010a",
  "ptp_status_script": "./scripts/ptp_status.sh",
  "ip_addr": "192.168.10.1",
  "auto_sinks_update": true
}
Most of it can be set through the GUI, too. I recall only configuring
the interface_name in the beginning.
Launch the Daemon
cd daemon
./aes67-daemon -c daemon.conf
This one too, stays in the foreground.
Daemon Web Interface
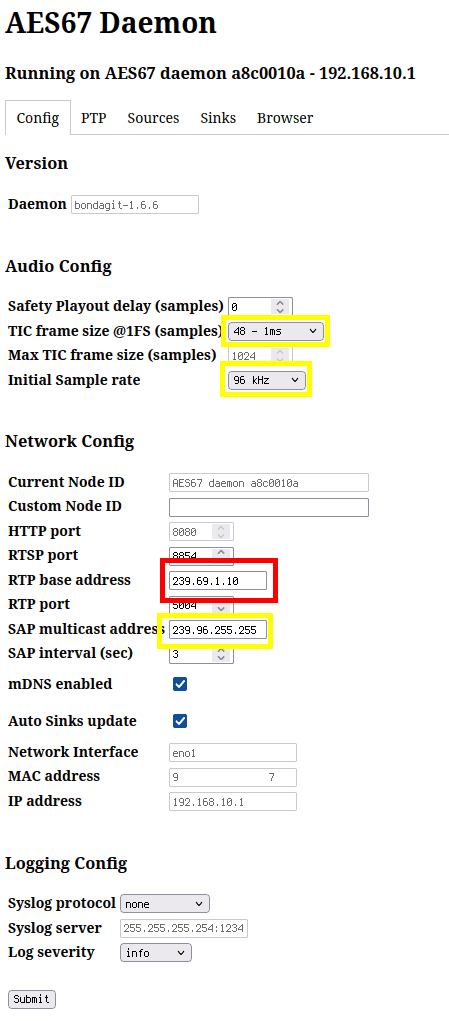
The web interface can be found under 127.0.0.1:8080. The
actual values to set are very similar to the configuration for the
proprietary daemon.
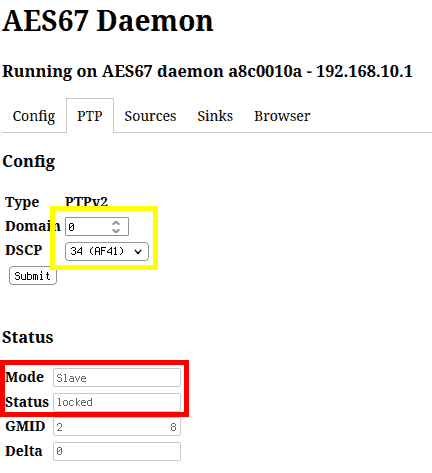
Again, the PTP clock should lock, and I don’t know what to set for DSCP, but 34/AF41 worked for me.
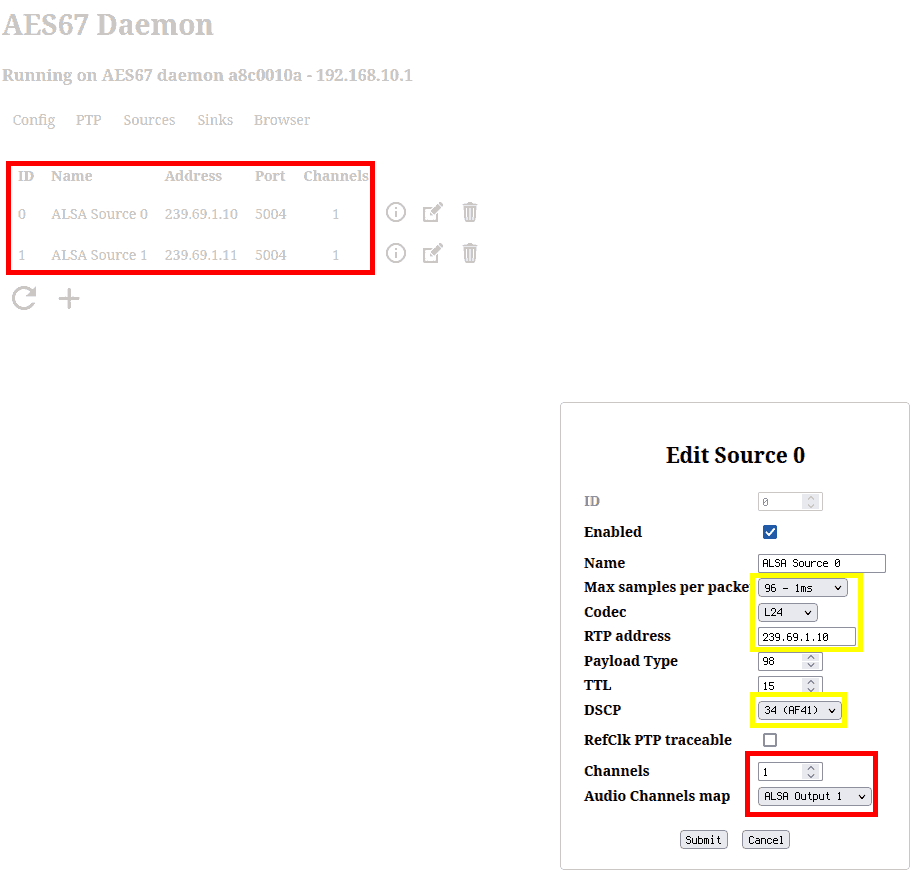
Again, two sources have to be configured with one channel each. Again, there is some codec and DSCP settings. I used L24 here and it worked. The configuration for the second stream is similar, except for different RTP address and Audio Channels map.
Speaker Configuration
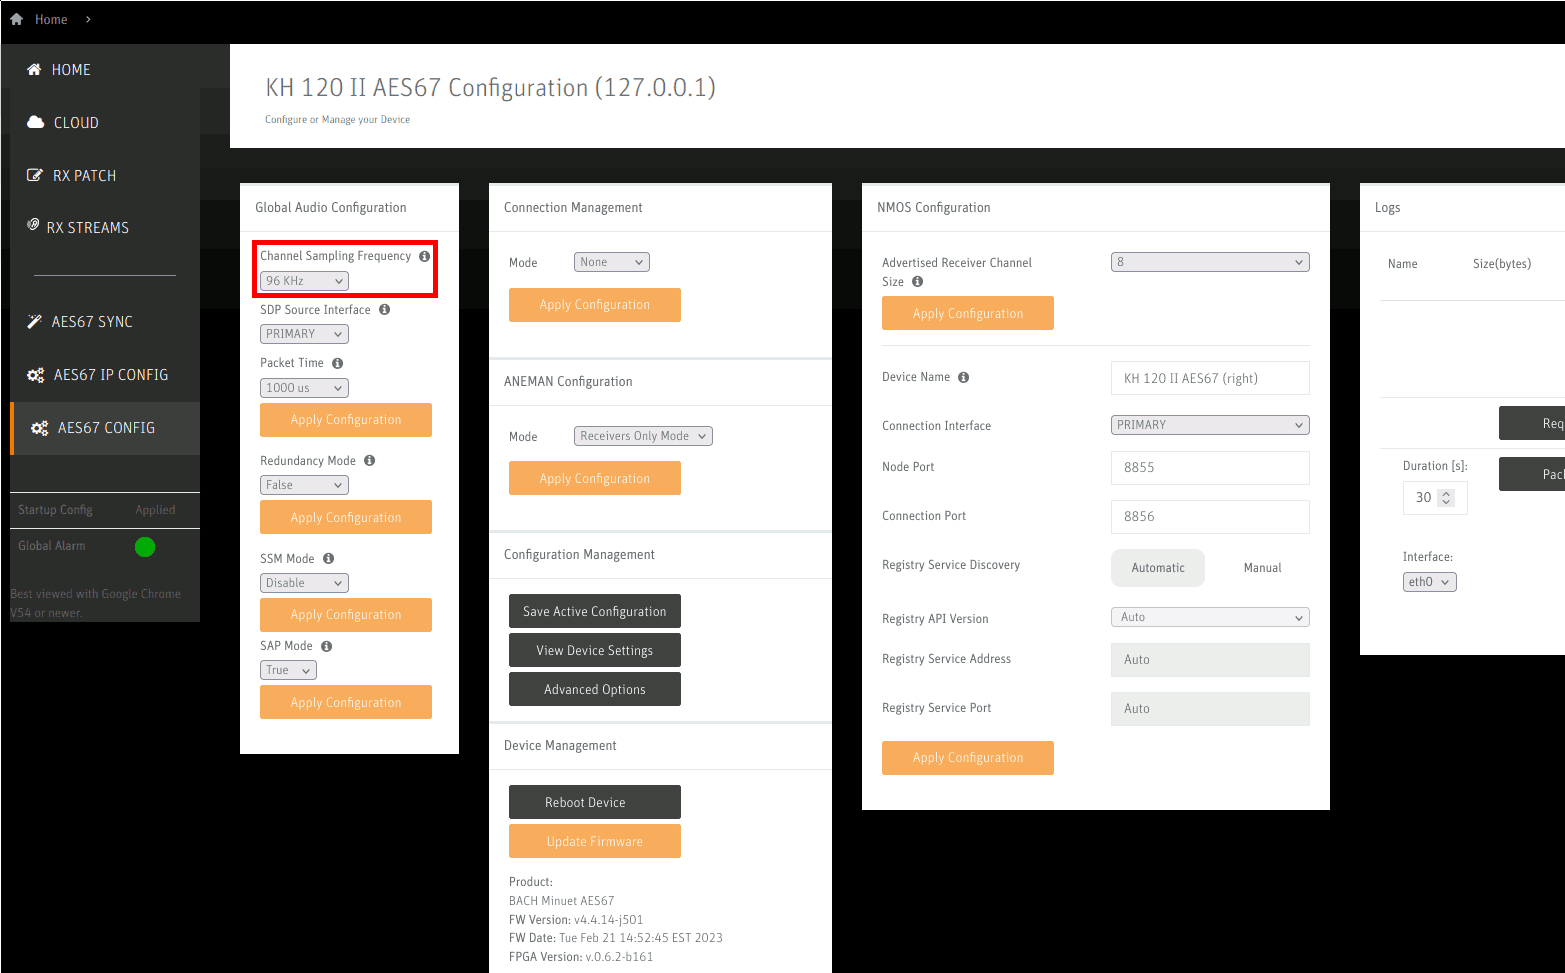
This time, the AES67 CONFIG needs to be edited to account for the higher Sampling Frequency of 96kHz. Do not forget to click Apply Configuration after changing the setting.
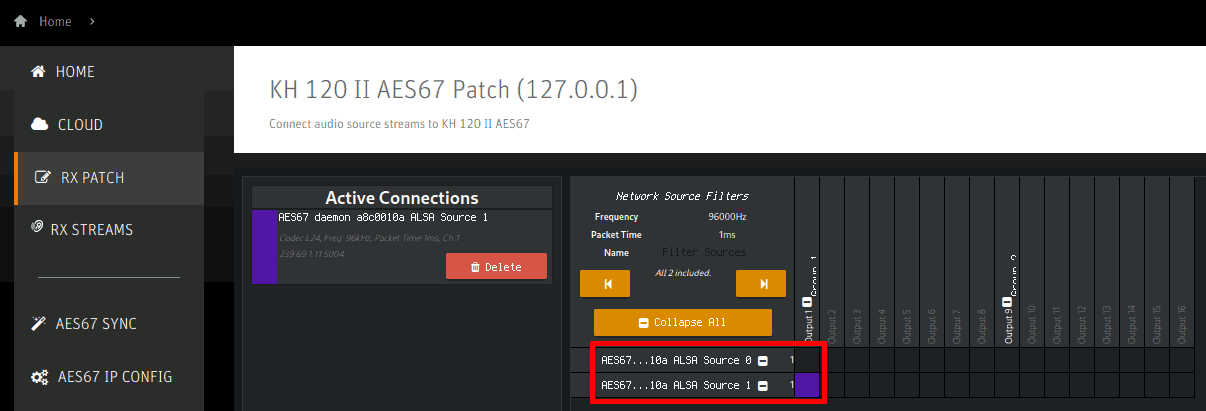
The RX PATCH settings are basically the same as for the proprietary daemon except that it is vital to remove any leftover assignments from the previous experiment and again it must be ensured that each speaker sees both streams there to assure that the connection actually works.
Playback
This time test with a 96kHz WAV file, here with volume reduced to 5% which is louder than the noisy switch already … :)
ffmpeg -i 01_01_adele_skyfall_smr.flac -filter:a volume=0.05 test96med.wav
aplay -D hw:RAVENNA test96med.wav
Volume Control with khtool
There is a free software tool claiming to support volume control for Neumann’s DSP-based speakers which could include the Neumann KH 120 II AES67 W, too.
It can be downloaded and run as follows:
git clone https://github.com/schwinn/khtool
git clone https://github.com/schwinn/pyssc
cp khtool/khtool.py pyssc
cd pyssc
chmod +x khtool.py
./khtool.py --help
Query speakers
./khtool.py -i eno1 -qSet logo brightness
./khtool.py -i eno1 --brightness 50 -t allSet volume
./khtool.py -i eno1 --level 50 -t allWhen in LOCAL mode, all of the settings change return a HTTP error code. Only when in NETWORK mode, do the API calls actually work. However, since no playback via AES67 seems to be possible in this mode, this effectively means the tool cannot be used for AES67 volume control on the speakers?
Notes on GStreamer
As far as I understand, GStreamer can generate AES67-compatible streams but does not automatically perform the necessary SAP announcments. This makes it impossible to play back the resulting stream on the speakers.
The following resources were of interest during the experiments:
- Explanation wrt. Clock handling (no code example there) https://coaxion.net/blog/2017/04/rtp-for-broadcasting-over-ip-use-cases-in-gstreamer-ptp-rfc7273-for-ravenna-aes67-smpte-2022-smpte-2110/
- Example command to play-back a WAV-file through gstreamer including the associated SDP description: https://gstreamer-devel.narkive.com/iXIYz0uk/using-gstreamer-to-convert-wav-rtp-results-in-low-quality-rtp-stream another example command line: https://gstreamer-devel.narkive.com/xoeDauAf/how-to-output-rtp-stream-from-a-wav-file-by-gstreamer-pipeline
There are also some Python scripts (+ SDP) that you might use to generate a suitable stream. The idea behind these scripts is to synchronize to a PTP clock which did not seem to work on my machine:
- Python Source with SDP: https://gist.github.com/philhartung/6f2905ea566bf5dbf5b0b3298008d1d3
- Advanced Python Source with additional clock synchronization code: https://gist.github.com/philhartung/72a2296a8c83a3468ffba509cdc9d104
- Code Lines that one could use to switch to the “system” clock https://gstreamer-devel.narkive.com/9Tlwoydk/gst-devel-synchronizing-audio-stream-with-system-clock
Example LinuxPTP command lines (looked like this in itself worked, but still, the scripts would not synchronize to it):
ptpd -CV -m -i eno1 # or? ptpd -CV -d 0 -E -m -i eno1
phc2sys -s eno1 -w
Example code inspired by the links above (although it now went to the Mainloop I couldn’t confirm whether it would actually work correctly?
# from https://gist.github.com/philhartung/72a2296a8c83a3468ffba509cdc9d104
gi.require_version('GstNet', '1.0')
from gi.repository import Gst, GstNet, GObject, GLib

Gst.init([])
mainloop = GLib.MainLoop()

pipelineString = """
audiotestsrc freq=480 volume=0.01 !
audioconvert !
audio/x-raw, format=S24BE, channels=2, rate=96000 !
rtpL24pay name=rtppay min-ptime=1000000 max-ptime=1000000 !
application/x-rtp, clock-rate=96000, channels=1, payload=98 !
udpsink host=239.69.1.11 port=5004 qos=true qos-dscp=34 multicast-iface=eno1
"""

pipeline = Gst.parse_launch(pipelineString)
# https://lazka.github.io/pgi-docs/
clock = Gst.SystemClock.obtain()

pipeline.use_clock(clock)
pipeline.set_start_time(Gst.CLOCK_TIME_NONE)
t0 = clock.get_time()
pipeline.set_base_time(t0)

ptpOffset = (round(t0 * (96000 / 1000000000)) & 0xffffffff)
pipeline.get_by_name('rtppay').set_property('timestamp-offset', ptpOffset)

pipeline.set_state(Gst.State.PLAYING)
print('starting mainloop')
mainloop.run()
Resampling
Live resampling incurs an audible quality loss, but with
libsamplerate (SRC) at highest quality it is barely (if at
all) noticable. Configure MPD as follows to use it:
resampler {
    plugin      "libsamplerate"
    type        "0"
}
audio_output {
    type        "alsa"
    name        "RAVENNA-AES67"
    device      "hw:CARD=RAVENNA,DEV=0"
    mixer_type      "software"
    allowed_formats "96000:24:2"
}
My old Intel NUC does it with (almost) no audible interruptions at 90-100% CPU for one core (i.e. it is at its limit…). The alternative (soxr) consumes much less CPU resources (40%) but is audibly worse in my opinion.
Good offline resampling can be done with ReSampler https://github.com/jniemann66/ReSampler. It is nicely easy to compile on a Debian system with the dependencies (libfftw3-dev, libsndfile1-dev) present:
g++ -pthread -std=gnu++17 -O3 -DUSE_AVX -mavx main.cpp ReSampler.cpp conversioninfo.cpp -o ReSampler -lfftw3 -lsndfileThen I used the following commandline to run it and did not get any audible artifacts:
./ReSampler -i input.flac -o output.flac -r 96000 -b 24Future Directions
Explore the efforts that are ongoing wrt. integrating AES67 into PipeWire (the new audio framework for Linux). This could be one way to go about the volume control and resampling issues, too. It seems to be “bleeding edge” as of now: https://gitlab.freedesktop.org/pipewire/pipewire/-/blob/c66aad9a7c260a1a7e4aa1d4203cf43db686bcc6/src/daemon/pipewire-aes67.conf.in
Check if a real-time kernel improves things. AFAIU it maybe does not help with the NUC at 100% CPU from resampling, but it may help with occasional latency-related audio dropouts if the 100% CPU part can be resolved e.g. after libsamplerate got support for multithreaded resampling or such. -> solved by using a faster CPU in the newer setup.
Establish a good playback setup based on the low-level findings summarized in this document. -> done, see aes67_music_listening(37)
Conclusion
AES67 can indeed be set up successfully, although the steps are not exactly trivial. In practice, several limits were experienced in the test setup. They could be related to missing knowledge about how to properly approach the respective issues but may also be inherent limits of the protocol since the AES67 is mostly out of scope for simple music listening purposes.
See Also
- AES67 software overview https://aes67.app/resources
- PipeWire details https://gitlab.freedesktop.org/pipewire/pipewire/-/wikis/AES67
- PTP details https://docs.fedoraproject.org/en-US/fedora/rawhide/system-administrators-guide/servers/Configuring_PTP_Using_ptp4l/
- JACK AES67 virtual sound card https://github.com/markmcconnell/mai
next article in series: aes67_music_listening(37)